7 minute reading time; ~1325 words
Welcome back!
Today, we’re going to talk about wireframing from our requirements and stories, and exploring how talking through a wireframe helps us refine our specifications.
Between the last post and this one, I’ve taken the requirements and user stories that we wrote about, and cleaned them up into a project plan. The documentation is still light, and that’s intentional, as we’re focusing on a very narrow scope of work; we want to get the basic template management and editing up and running first.
By the end of this post, we will have some refined wireframes and requirements, and a firm foundation for working on workflows and technical requirements!
If you haven’t read it already, I’d suggest you start at An App From Scratch: Part 1 – What To Build. You can also find all the related documents and code here: Building Tailgunner.
Wireframes
From our initial project plan, I created wireframes based on two user stories (US1, US2) to illustrate the requirements. These wireframes are intentionally not high-fidelity, focusing on interaction points rather than exact design details.
Initial Designs
After carefully reading both user stories, and the requirements in them, I’ve made a wireframe of both pages that cover what is needed from the requirements. Below, you can see the template list page, showing some mock information, and covering the details from our second user story.
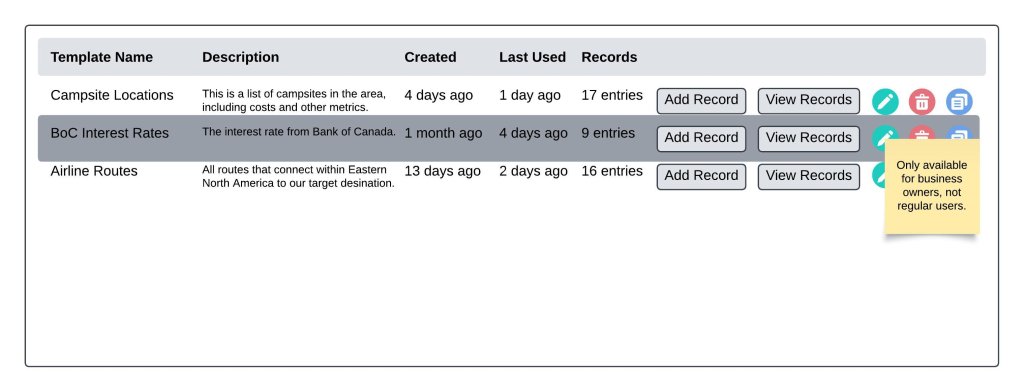
You can see how the requirements translate into an actual interface, and how many unspoken requirements or ideas are included in the mockup that aren’t in the documentation itself. For example, you can see the dates aren’t absolute dates, but rather relative dates, making them easier to read and work with.
This is a medium-fidelity wireframe (low-fidelity is usually sketches on paper). This level of design is detailed enough to have a conversation about the stories and how they translate, but not so detailed that you’re locked into specific design choices. Later, once we have a solid agreement, and are working toward final technical requirements, the design team (or I 😆) will generate high-fidelity wireframes, which usually have specific color and layout choices, and are much closer to the finished product.
Note: the icons only have color because the design set I used had them. Overall it’s recommended to minimize color usage in a mockup like this. The idea is to figure out if we have the right elements to cover the requirements and make the tool usable, not to convey the exact design.
Breaking Down The Elements
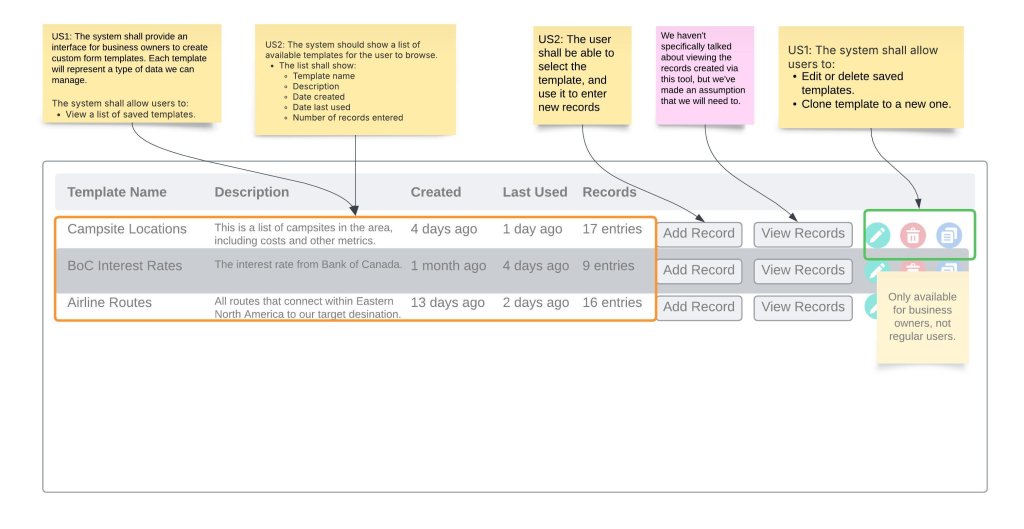
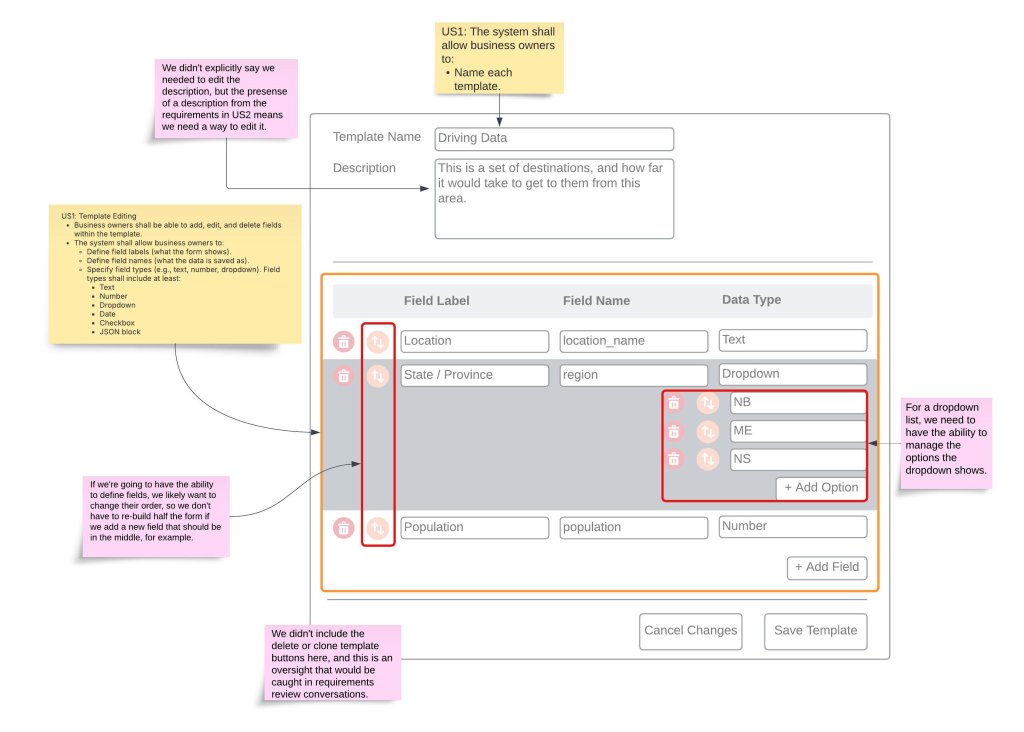
Here you can see how each story is broken down and applied to the wireframes we’ve put together. In yellow notes, you’ll see each requirement, and the wireframe elements that it matches, and in pink, you can see assumptions or mistakes we made in the designs.
As part of the review and discussion around the initial wireframes, these assumptions and mistakes should be addressed, and either added to the requirements, or removed from the wireframe and noted as out of scope (this way we have a record of what we have explicitly considered and chosen to exclude).
Revised Requirements
Now that we’ve reviewed our requirements in context of an actual wireframe, and highlighted the talking points, it’s time to revise our requirements to better align with stakeholder expectations.
US1 – User Story
As a business owner, I want to create a custom form template based on my needs so that I can capture specific data unique to my workflow.
Acceptance Criteria
- Business owners can define fields and field types (e.g., text, number, dropdown).
- Templates can be saved and reused.
Requirements
- Template Management
- The system shall provide an interface for business owners to create custom form templates. Each template will represent a type of data we can manage. The system shall allow business owners to:
- Name each template.
- View a list of saved templates.
- Edit or delete saved templates.
- Clone template to a new one. This will copy all field definitions as well.
- The system shall provide an interface for business owners to create custom form templates. Each template will represent a type of data we can manage. The system shall allow business owners to:
- Template Editing
- Business owners shall be able to change the name or description within the edit interface.
- Business owners shall be able to add, edit, and delete fields within the template.
- The system shall allow business owners to:
- Define field labels (what the form shows).
- Define field names (what the data is saved as).
- Specify field types (e.g., text, number, dropdown). Field types shall include at least:
- Text
- Number
- Dropdown
- Add, edit, reorder, and delete options for the dropdown
- Date
- Checkbox
- JSON block
- Re-order the defined fields
- Business owners shall be able to delete or clone the template from the edit interface.
US2 – User Story
As a user, I want to use a predefined form template so that I can ensure data is entered in a consistent format.
Acceptance Criteria
- The user can select the form from a list of all available templates.
- The list of templates shows when the template was created, as well as some statistics on usage.
Requirements
- The system should show a list of available templates for the user to browse.
- The list shall show:
- Template name
- Description
- Date created
- Date last used
- Number of records entered
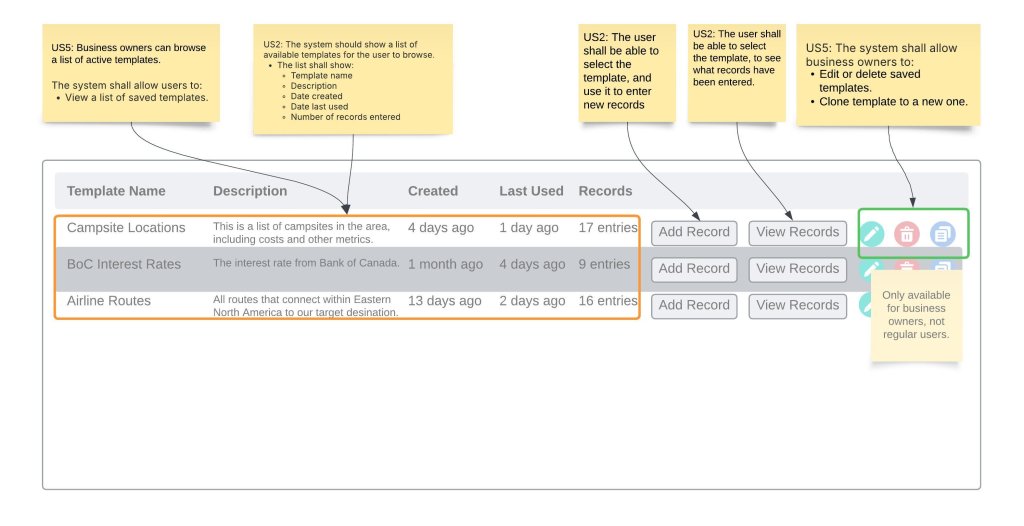
- The user shall be able to select the template, and use it to enter new records.
- The user shall be able to select the template, to see what records have been entered.
- The list shall show:
Now that we’re done a first pass at the wireframes, and have revised our user stories, it’s become obvious that we need to break our first story up, because it’s doing too much. Here you can see how that’s been done, splitting out pieces from the original US1 to US5. We’re keeping the original numbering, because other documents may already be referencing these stories.
US1 – User Story
As a business owner, I want to create a custom form template based on my needs so that I can capture specific data unique to my workflow.
Acceptance Criteria
- Business owners can define fields and field types (e.g., text, number, dropdown).
- Templates can be saved and reused.
Requirements
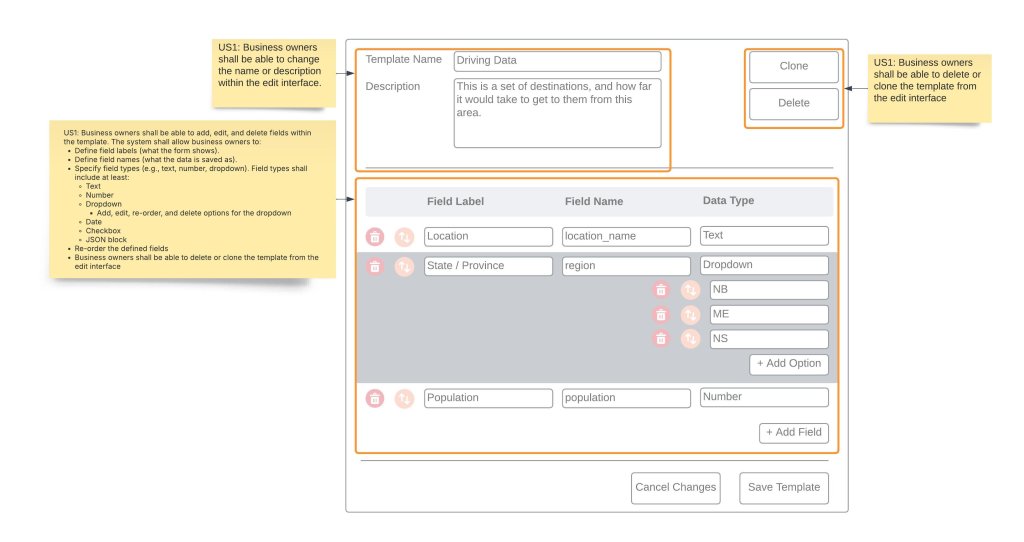
- Business owners shall be able to change the name or description within the edit interface.
- Business owners shall be able to add, edit, and delete fields within the template.
- The system shall allow business owners to:
- Define field labels (what the form shows).
- Define field names (what the data is saved as).
- Specify field types (e.g., text, number, dropdown). Field types shall include at least:
- Text
- Number
- Dropdown
- Add, edit, re-order, and delete options for the dropdown
- Date
- Checkbox
- JSON block
- Re-order the defined fields
- Business owners shall be able to delete or clone the template from the edit interface
US5 – User Story
As a business owner, I want to list, create, edit, and delete custom form templates based on my needs so that I can capture specific data unique to my workflow.
Acceptance Criteria
- Business owners can browse a list of active templates.
- Templates can be managed via the list interface, without having to use the edit interface.
Requirements
- The system shall provide an interface for business owners to create custom form templates. Each template will represent a type of data we can manage. The system shall allow business owners to:
- Name each template.
- View a list of saved templates.
- Edit or delete saved templates.
- Clone template to a new one. This will copy all field definitions as well.
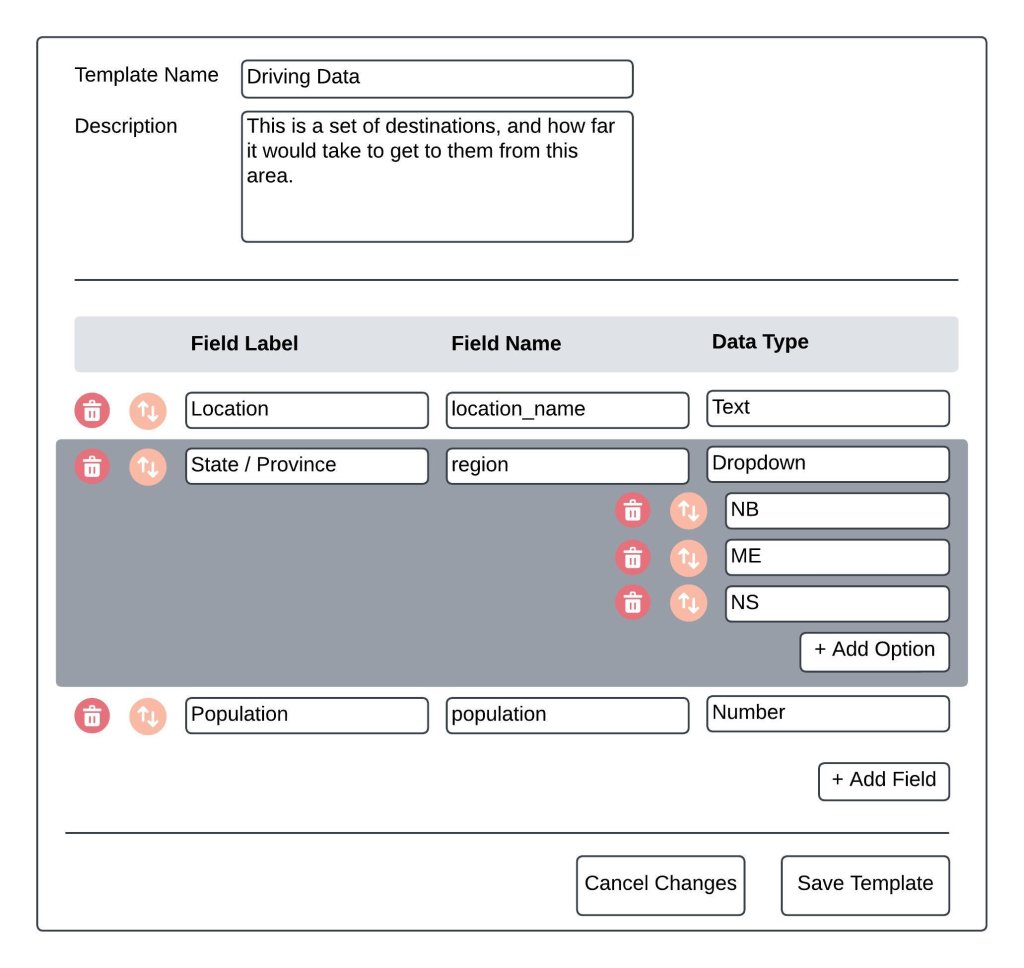
Below are the updated wireframes, based on the updates we made to the stories above.
Wrapping It Up
As you can see from the discussion around just two stories and two wireframes, there is a lot of material to explore. In this post, we worked through the refinement process, and ended up with three more fleshed out stories, and some good wireframes to guide discussions around workflow and technical requirements.
Did I miss something in my stories or wireframe? Share your thoughts in the comments below!
Thanks for taking the time to read this, and stay tuned for the next part: documenting and validating workflows.
Cheers!

Leave a Reply